Hiya
I need to take the engine out of my plus 2 and I was wondering what the best way to sling it is? The head is off at the moment and also can not decide whether i would be best building engine back up before refitting or putting head and carbs back on in situ, any words of advice out there?
Thanks
Andy
Andy,
I’ve no doubt you will get lots of different methods suggested but I sling my engine with two slings, one at the rear just in front of the flywheel and the other at the front under the front crank seal.
As I am often working by myself I always take the head off first and put it back on when the block is in the car.
cheers
John
flickr.com/photos/16638375@N … 202952079/
For me I like to build on a engine stand so you can turn it 360 and less of a chance of doing something to the paintwork on the car
Neil
Andi
I’d put the head on first,there’s no more back breaking work than a head job on a Lotus in situ…as for the sling I prefer side to side,not fore and aft, round the engine mountings…
John ![]()
I vote for this arrangement, too. The exhaust side of the block has two 3/8" tapped holes that you can use on that side. A sling around the intake runners works on the other side.
Andi, my tip if using an engine crane is to make sure there is a proper swivel in the lifting hook. The cranes as supplied have a hook which is fitted to a chain and the load will always want to rotate. A real pain in the proverbial.
Also, it’s about time someone invented a remote valve for the hydraulic ram…any ideas out there.
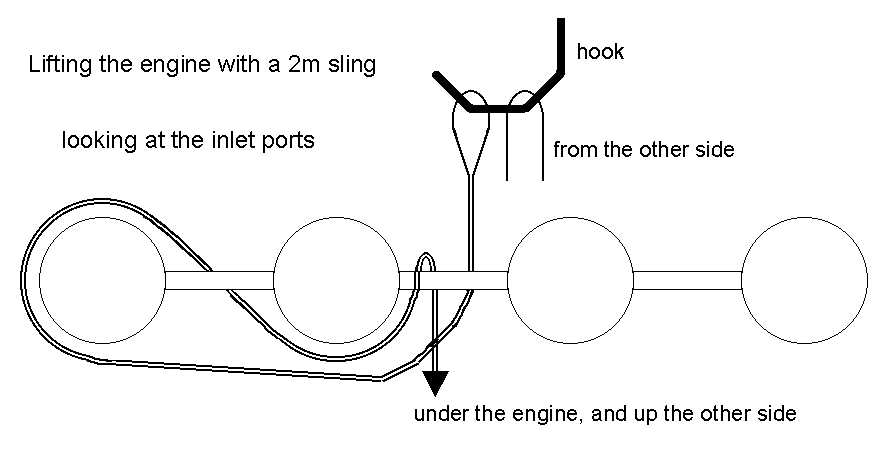
If the sling goes through the center of the inlet ports (head on obviously), the engine, without gearbox, is approximately balanced fore and aft and can be easily angled downwards when refitting.
Gordon
An interesting technique Gordon and thanks for the diagram. One thing I had thought about doing was to screw lifting eyes into 4 of the head bolt holes. Has anyone tried this and does anyone know what the size and thread is? Plus any comments?
Andy
Thanks Ralph, that thread gives allot of food for thought.
Cheers
Andy
reply to your Mail
flickr.com/photos/16638375@N … 202952079/
Andy heres the pics above of the stand bracket the hook bolts on to the rear exhaust studs ,As I like to have two ropes one round the front pully fixied and the one round the rear the hook stop the rope slipping this alow the angle to be change with the help of a jack under the sump
Neil
I used to find it much more convenient to replace the head, time the cams and ignition, replace the exhaust, assemble engine and gearbox, and replace as a complete unit. Dropping the propshaft gives a bit more angle. ![]()
Fully removeable engine mounts and cross member on Spyder chasssis helps, as does concentric slave clutch release .
However the projecting reverse detent in the centre of the T9 gearbox cover plate now catches on the forward end of the transmission tunnel. This can be removed when removing engine/gb, put must be oriented in place when refitting.
Removing/ refitting with sump off gives more clearance, but careful with the oil pick-up ![]()
Andy
I prefer the engine and gearbox as a unit. I use a medium duty tie down strap to run a loop from #3 intake runner to thermostat housing. -see picture - right or wrong this has always worked for me…
George

As the Guvnor (ACBC) used to say, (paraphrasing here) a 1/4 inch bolt suffices to lift a London Bus.
So using one threaded hole in the block bolting something firmly to the block to run a chain
to is sufficient strength-wise.
With the head still on during removal/installation I found the hardest job was to keep the oil filler cap
from rubbing against the body and harming the paint. And I did not totally succeed ![]()
Second hardest was installing the exhaust down-pipes during re-installation.
David Anderson. 1966 S3, professionally rebuilt in 1990 as Sprint with new frame, body and more
from factory.
That’s definitely a top tip, if the you have the later tubular manifold. Do not fit the alternator or the exhaust-side engine mount prior to dropping the engine into place. Then loosely fit the exhaust manifold; then you can fit the engine mounts and everything else.
Paddy
Brian Buckland in his book “The Rebuilding of a Lotus Elan” has comprehensive removal instructions and pictures on pp 347-353.
It covers both Elan and Spyder chassis.
Should answer any questions.
David
1968 36/7988
The twin cam is out thanks one and all. Had to put the old girl on axle stands at the front, take a wheel off and put the engine crane in from the size even on full extension in order to get the hook to plum nicely over the engine. Was glad I brought a load leveller as made keeping the engine at the right angle for withdrawl nice and easy and can see it will be very useful to get the angle right for refitment.
Engine is now on a stand via the alternator side engine mount bolts, thanks to a couple of short lengths of 1" square steel tube (RHS), 3 x M8 bolts and quite a few penny washers for spacing. Looks like it is solid on the stand and will be easy to work on.
Thanks everyone for your help in getting the twin cam out, now time for a few decisions such as do I replace the clutch pressure plate as well as the clutch plate? Do i go for a standard or heavy duty clutch? Shall I replace the release bearing? Why is there a load of black gunky stuff in the belll housing? Do I just clean up the flywheel or should I get it skimmed? And that’s before I have taken the sump off and checked out the crankshaft LOL
Cheers
Andy
Hi Andy, I’d replace all three clutch components, especially if you’re keeping the car and driving a fair amount. The black stuff in the bell housing could be oil and clutch facing dust. Check the rear seal. How does the flywheel look? Eric
ps: I may have missed a thread or page about your car… was it running before you removed the engine?
Yes the car was running before I pulled the engine. Originally I remvoed the head as was getting oil in the coolant and therefore suspected a head gasket. When I pulled the head I found damage to piston 3 and have subsequently found damage to piston 2, which is under discussion in a seperate thread. The flywheel was fairly clean, although a bit mucky on driven side, but the engine side was clean and there didnt appear to be any evidence of a recent oil leak. There was a light coating of oil and muck on outside of engine which cleaned up very quickly with Gunk. The only other thing was that the upper half of the backing plate was missing and so oil et al could have got into the bell housing quite easily. I am trying to to disturb more components than necessary, as it looks like the engine has been recently rebuilt, although its now becoming quiestionable about how well it was done. At the moment I am going through a period of assessment and measuring before ordering anything whilst I decide exactly what needs doing based on what has gone wrong.
Cheers
Andy