Heater valve clearance?

Next Issue:

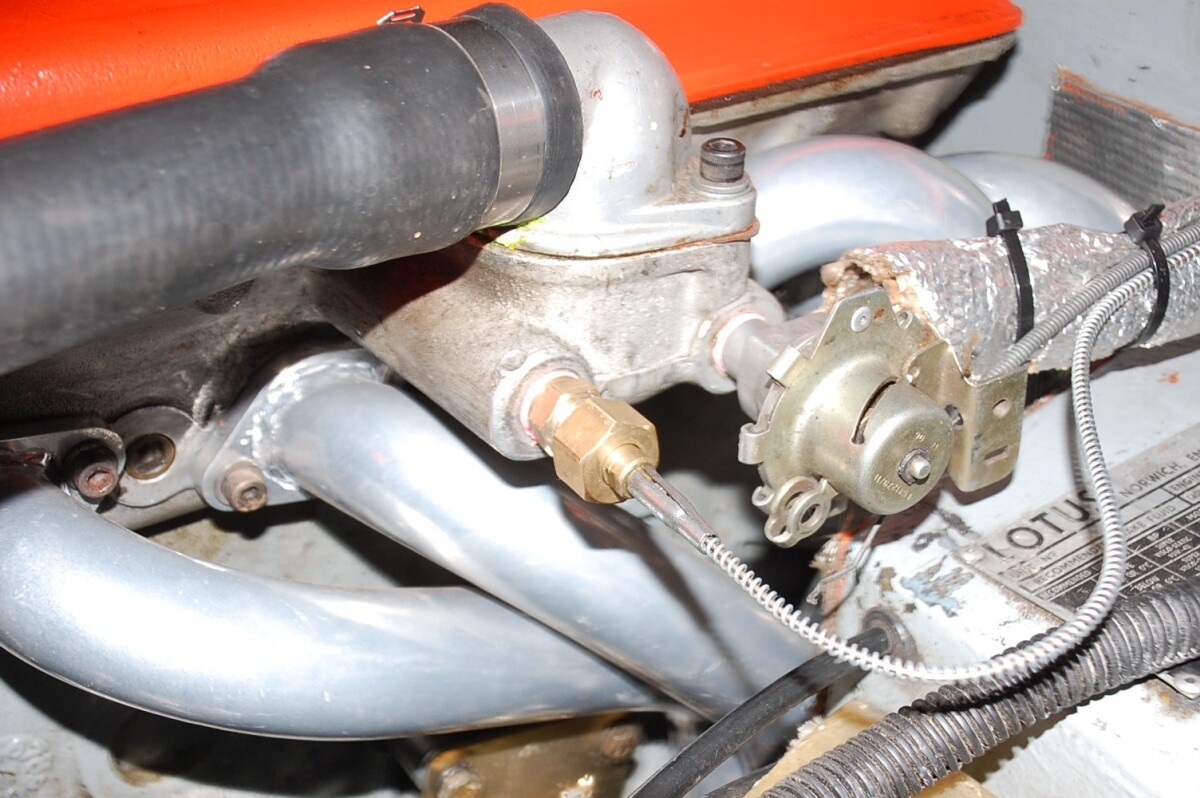
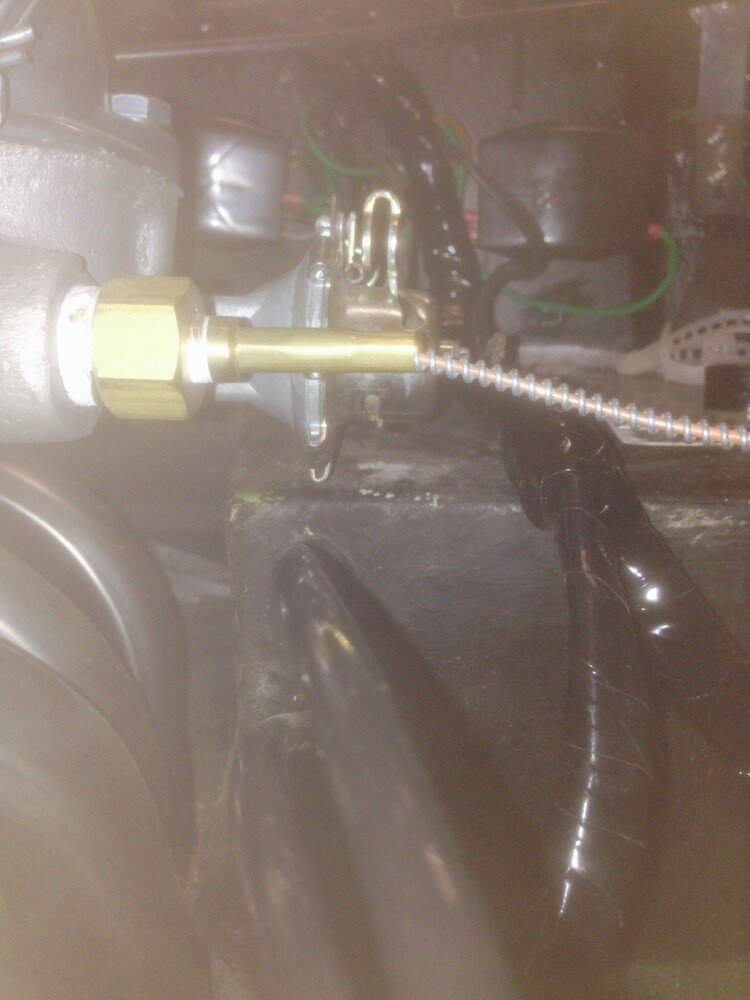
After installing the engine recently, I’ve noticed how the clearance of the underside of the Heater valve to the Fibreglass body is almost nil ? ( and I’m worried about it !)

Checking for photo’s in the various publications, does not clearly show how much gap is required either.

I’m worried that flex in the engine mounts and vibration from the engine may cause the Heater valve to rub against the body, and cause damage to both ?

Further more, I thought the main engine compartment wiring loom was also routed below the valve when I stripped the vehicle ( many years ago!), as the fixing strap holes are still evident? ( I suppose this could be re-routed to the side ?)

Any thoughts on what the correct safe clearance should be - and how to resolve it?

Should it be at least 1/2", more, or less ?

Or am I worrying too much and this is normal?

Is it possible to get the engine mounts mixed up side to side, if so, do they produce different heights in engine position, etc.?

Then there’s the rocker box filler cap / bonnet clearance issue, if the engine is raised! ( I haven’t really checked this clearance yet as the rocker box is not installed - suppose I’ve got that to come!)

Triple whammy problem methinks ?

Your assistance and guidance would be appreciated, as ever.

Regards,

Phil.
Around 5 to 7 mm clearance on mine. You can slot the engine mount holes if you want to raise the engine a little.

cheers
Rohan

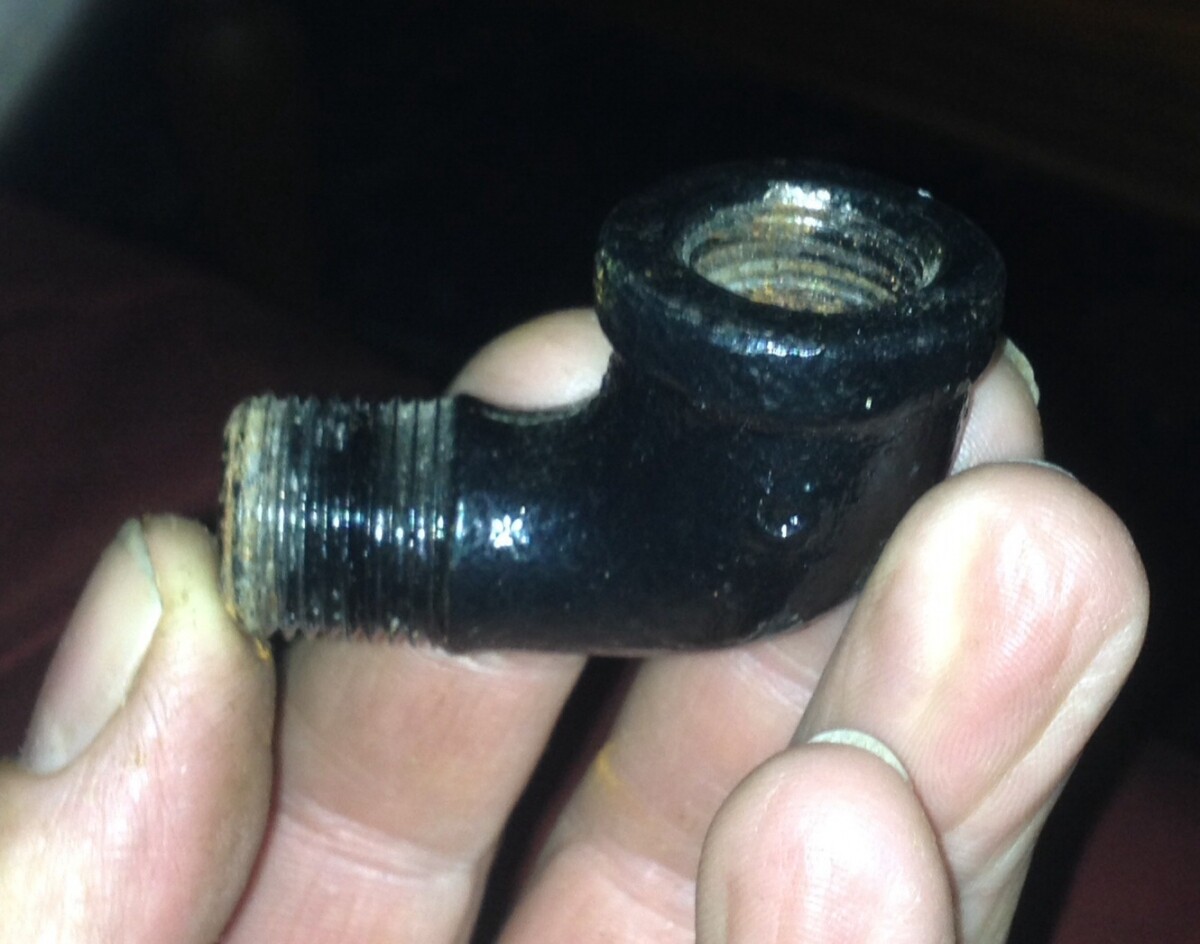
My s3 has this adaptor, which takes the heater valve right away from the bodywork. Standard plumbing fitting, cheap as…

Couldn’t the heater valve and thermistor swap places? Is a longer cable available?

My car originally had a 45 degree plumbing adapter as well, but that is treating the symptom - not the cause.

Installing new engine mounts fixed the issue properly.

Yes, If you are not insistent on originality, the simplest option is to swap over the heater valve with the temperature gauge bulb. Mine have been swapped over since about 1983.

You may have a problem doing this if the heater control knob wire is not long enough, but in my case they just fit.

But as implied by robertverhey above, the threads are standard UK plumbing threads and a trip to B&Q gives you many possible options for moving the valve a bit. I’ve even contemplated replacing the Lotus valve with a bog-standard washing-machine water supply tap, which is much more compact and has actuating shaft to which a suitable lever can be added with relative ease.

To answer a couple of your questions, “almost nil” is definitely wrong. It’ll turn into nil in no time. There are lots of threads in here about correct engine mounts for Weber and Stromberg engines. You can easily get them wrong and they will screw with the engine height.

My regular check for pending engine mount expiry is to be able to run my fingers under the heater valve and the carburetor airbox reasonably easily - a slight squeeze for both gaps.

I seem to be in the habit of doing it to every Elan I see, which is rather rude. :frowning:

Nick

Phil,
Just checked my S4. I have approx’ 20mm clearance below the heater valve. I also measured the difference between installing the L/H engine mount the right way up and upside down. The difference is approx’ 20mm. Worth a look?
Also, my main wiring loom is outboard of the heater valve, but only just.
Cheers,
Colin.

Great replies, thanks Gents.

I think I need to check my engine mount types - can I have more detail please?

New chassis, new engine mounts, body off refurb - maybe the body isn’t seated correctly ?

Just several factors to get right all at once!

I’ll update the thread as more is found out and (hopefully ! ) - issues are rectified.

How much filler cap / bonnet clearance should there be then ?

Help is much appreciated,

Many thanks,

Phil.

Phil,
For pictures of various engine mounts look here: sjsportscars.co.uk/index.php?mod=10
The closed section of the mount goes at the top. This allows the closed section of the mount to rest metal on metal when/if the rubber fails.
Cheers,
Colin.

Yes!
Provided you have the engine mounts the correct way round.

The engine is tilted down on the exhaust side. The torque reaction from the engine is in the opposite sense so the gap normally increases on the exhaust side and the carbs hit on the other side - Your carbs are less likely to hit the footwell.

Get her on the road and worry about it when you have a problem - You must be nearly there by now!

I would worry more about the nylon vac hoses being too close to the exhaust and melting. Take some slack out and tie them to the wheel arch with a P Clip.

Thanks AHM, I had thought they were a little close to the exhaust!

It’s just when I look at pictures of other engine bay installations, everything seems to be neat and tidy, but try as I may, mine always looks as if it could be better !

Yes, nearly there now, hopefully should be all basically sorted and up and running in a month.

I feel better about the clearance of the Heater Valve, now I know the engine torque’s the other way, although, " every action has an equal and opposite re-action " doesn’t it?

It occurs to me that there isn’t an engine mount that would put the heater valve too low. The regular ones (Weber exhaust-side & Stromberg) would make the height correct, while a Weber inlet-side mount would make it too high. Is that right?

So if the valve is too low the mount must be knackered or upside down?

My heater valve was resting on top of the footwell a couple of years ago and when I got the mount out it was, indeed, totally knackered. In two pieces. I had changed the inlet side mount a week or two before because the airbox was thumping the footwell. At the time the exhaust side mount seemed fine. But the strong new inlet side mount apparently overwhelmed the exhaust one, which promptly failed in disgust. So in future I’ll change them in pairs. :frowning:

Nick

Well I checked the exhaust side mount and it’s the correct way up!

Both mounts were brand new 5 years ago when I started the rebuild!

The engine has not run since, so the mounts can’t be knacker can they?

I have now noticed the nearest stainless steel exhaust downpipe is awfully close to the fibreglass corner of the footwell body also !

So where do I go from here ?

The heater valve will snap if it’s left in its current position, that’s Bound to happen at the most inconvenient moment - you can bet your bottom dollar!

Things are not looking best good here!

RECAP:-

Footwell fibreglass is going to burn.

Heater valve is going to snap off - with engine vibration.

Filler cap will foul the underside of the bonnet .

Phnumatic tubes will melt.

Wiring loom gets rubbed into pieces !

Oh Jesu! I’ve constructed a failure!

How much of this is reality???

Phil,
If the body is sitting correctly on the chassis and the engine mounts are correctly fitted and in good nick, I don’t see how you could possibly have a clearance problem. Could you post some pictures of your mounts so that all and sundry can pass an opinion?
I have used reflective type, self adhesive heatshield material to protect the fiberglass in the vicinity of the extractors.
Also, the heater valve does not appear to be the correct part. The lever should be at the bottom. The item fitted also appears to be in the closed position. To open the valve it looks like the lever would have to be moved toward the front of the car. To do this the knob inside would have to pushed toward the dash. IN for OPEN, OUT for CLOSED. This would be working in the wrong sense.
Cheers,
Colin.

There should be a gap you can get a small finger into in the top of the mount between the centre steel plate and the top of the outer steel inverted U shape. If that gap of about 10 to 15mm has closed up excessively then yes the mount is knackered

Its tight in there for all the issues you have listed but none are insurmountable problems !.

Are you sure you have the right heater valve assembled the right way. The cable fitting appears at the top when it should be at the bottom in the picture you posted ( sorry did not see that before). A picture of mine below

If the fibre glass is getting to hot from the headers cover it with stick on heat shielding -I use the woven Kevlar with aluminium facing and stick it on with high temperature silicone gasket sealant ( The Loctite red coloured one). You will note in my photo that I wrap the heater water hose in heat insulation as this gets hot with the TTR competition headers which rise up above the foot well at the rear

My filler cap has 80 mm clearance to the bonnet with 15 mm clearance on the heater valve to foot well

The vacuum tubes are OK and don’t melt as the headers run back and the tubes forwards so are never close. The tubes are routed to generally follow the line of the chassis outer edge are the run down the outside of the radiator mounting side plate

You should run the wiring loom outboard of the heater valve sufficiently so nothing rubs on it.

cheers
Rohan

Phil,

Do you have the engine mount spacers in correctly?

Yes the manifold will cook the side of the footwell - to the extent that you get smoke in a traffic jam - so worth putting some kind of heatshield on it. The original cast iron one didn’t get so close, so when you put a new tubular one on you get a terrible smell and smoke.

Does this entry help? lotus-twincam-f39/engine-mountings-t15838.html

Take a look at the pictures at rdent.com too.

Nick

All,

Thanks for the detailed replies, it’s much appreciated.

I’ll check the engine mounts to ensure the gaps are still good.

My heater valve is as noted, opposite to the one in the picture you have supplied, however, the Bowden cable line is almost dead straight, so seems a better operating option in my opinion?

That’s assuming that the flat steel flanges on either valve are the same shape / diameter - because it’s these ‘outer extremities’ that will foul first?

Any reason that they can’t be reduced with a grinder or similar butcher tool?

Are there two versions of this valve available? If so, which is the correct? The one with the orientation of the cable pull towards the top or the bottom ?

When I look at the gap between the nearest exhaust down tube and the corner of the fibreglass - it is only about 1/8" ! - hardly enough room to get anything I between to act as a heat shield?

Am I still better to try to get something In between, that may make heat transfer even easier? - or just leave an air gap and ignore the burning !!??

I would have thought the dull red glow of the exhaust would always get the better of the combustible fibreglass !!

What size extinguisher does one carry. - any advice?

This is not very well engineered is it? - can’t help thinking someone should have come up with a better solution by now - how many years since tubular exhausts were introduced.!!!

Oh! Dear ! - can’t help thinking my pride and joy is fast becoming a ‘mantle piece display item’ - rather than an actual enjoyable drive ?

I understand they can be / are, a ‘weekend hobby’ like early Landrovers, requiring hours of ‘tatting’ in the workshop, but surely some of this is basic poor design that could / should have been sorted by now?

This is where the need to perpetuate originality, falls short of practicability and becomes un- enjoyable and annoying!

Is it possible to get these niggle’s / issues sorted - or are there a million more to come?

Have you all been through this route before me?

Regards,

Phil.

Unless you have the TTR full race headers there is no way they should be so close to the fibreglass; it sounds like your engine is to far left and maybe tilted to far also so something strange is going on - more photos would help. This problem is also probably contributing to your heater valve problem also

The upside down heater valve is certainly not original and if its like mine the flange on the opposite side to the lever is the bigger part and would put it closer to the foot well. You cant grind it off much as there is a rivet in it that holds the whole heater valve assembly together.

cheers
Rohan