Hey everyone, as I’m going through and sorting out my lovely little Elan I want to sort out the emergency brake so I don’t have to rely on leaving the car in gear when parked.
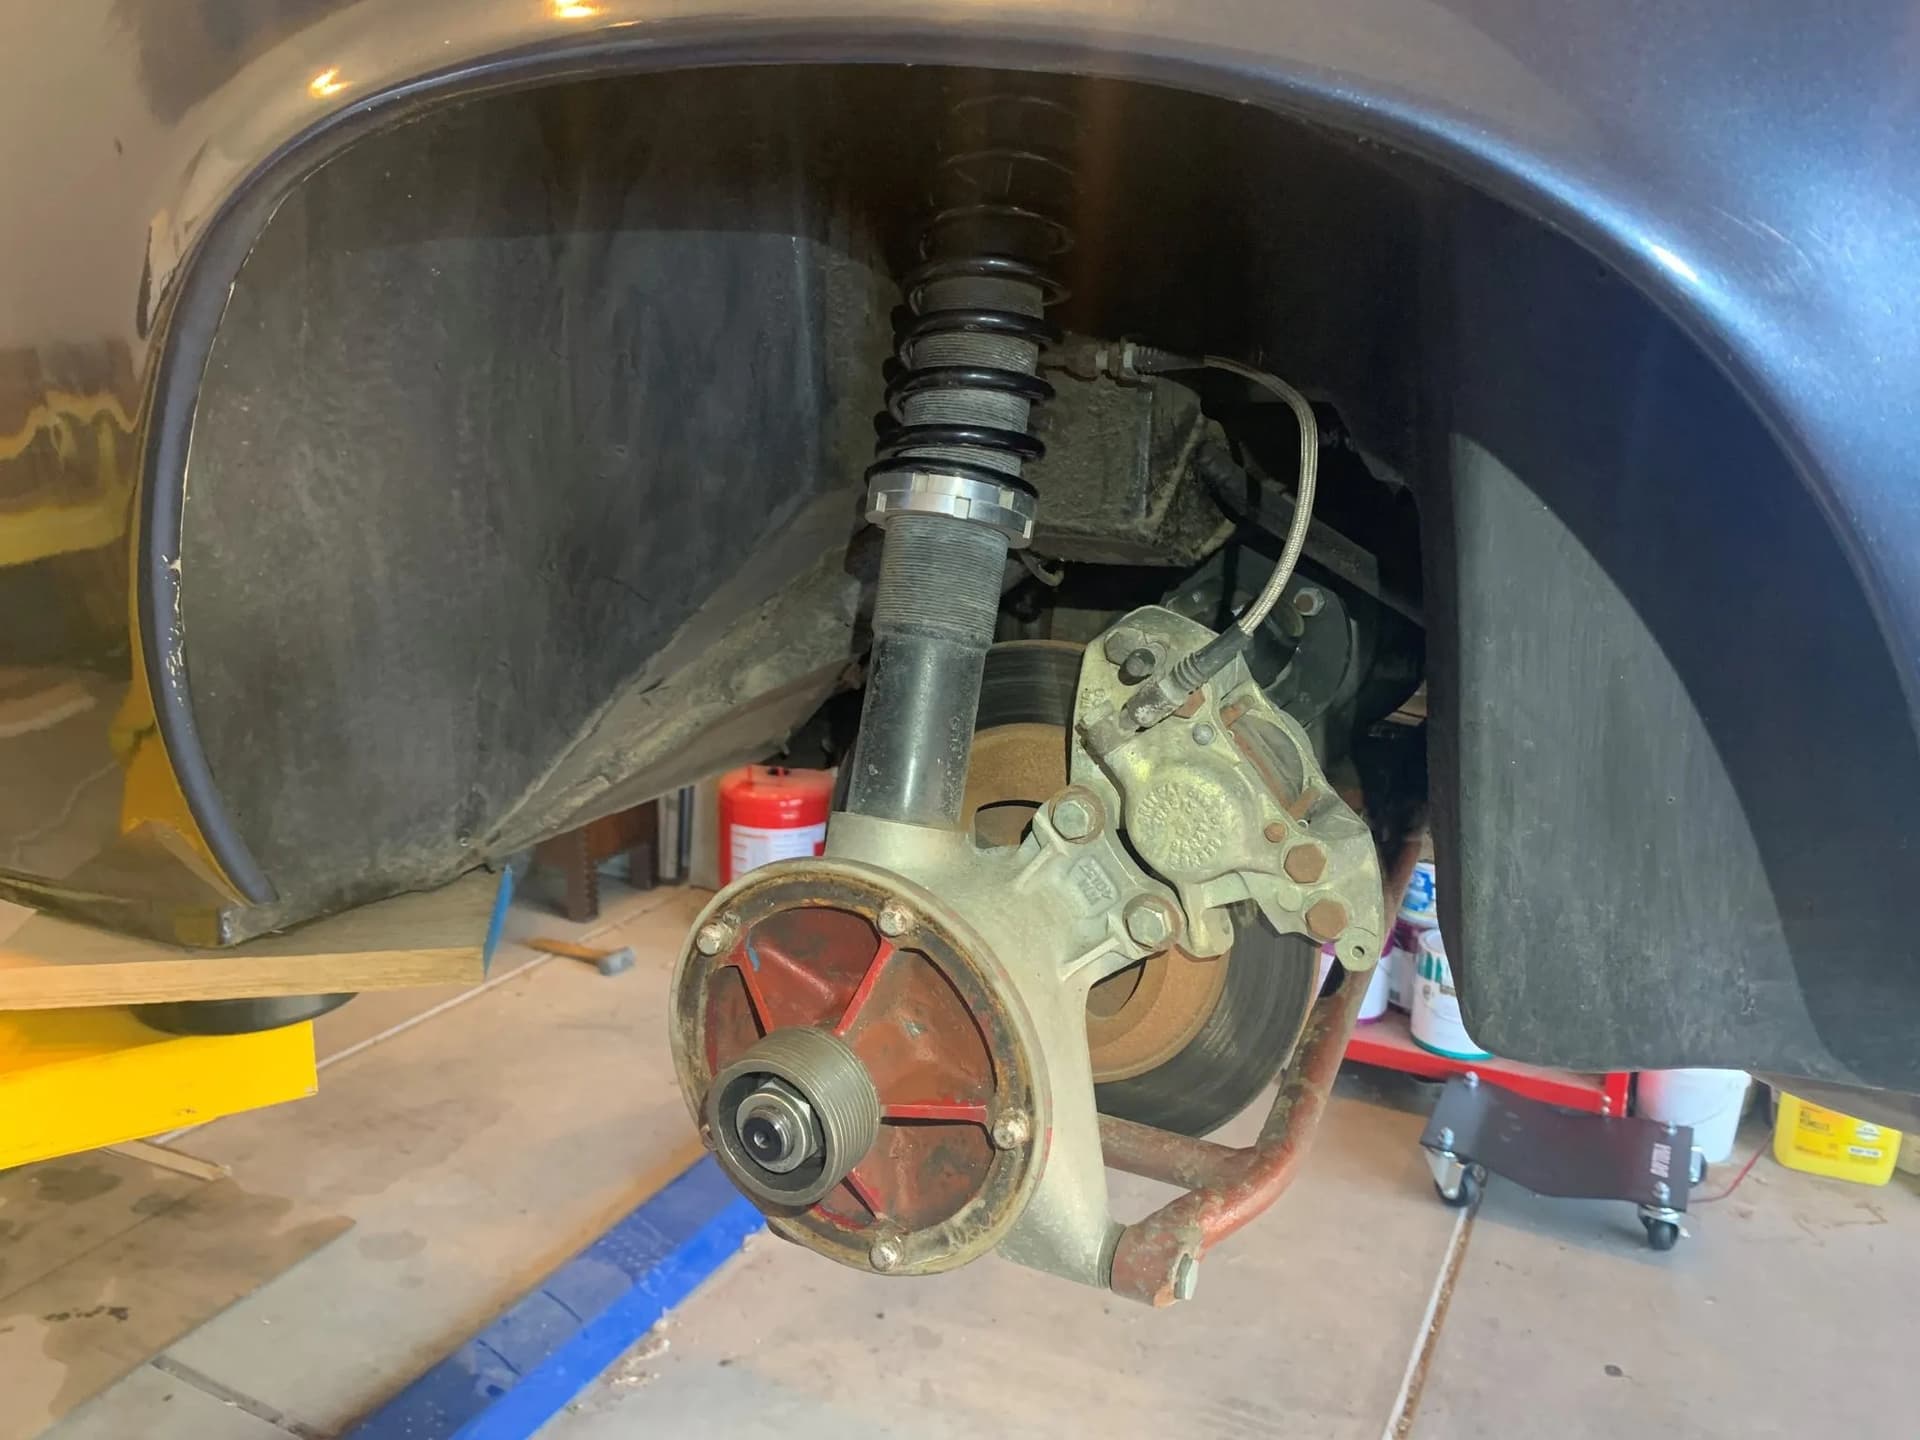
Another pic from the car on the lift from the auction.
I believe its not connected, but haven’t quite dug into it all just yet. I have the Shop Manual too to pour through soon, but figured I could ask so that I could have everything, or at least most of it ready when I get into it.
After digging through my spares, I believe these are part of the system
You seem to have most of the parts. I can’t comment as to if the bits in the box are complete but I have found the parts book useful just for its diagrams.
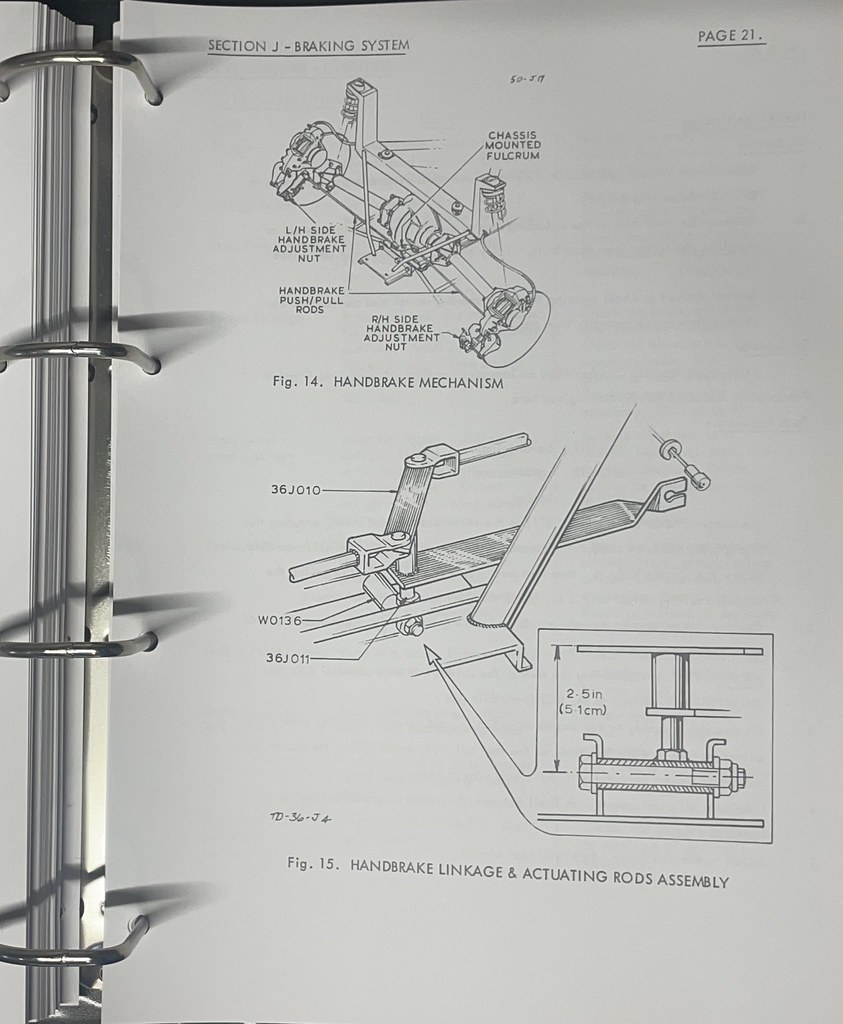
The two rods attach at one end to the parking brake and at the other end to something called the “handbrake tree” which is located behind the differential and pivoted on the chassis. The parking brake cable attaches to the “handbrake tree” at one end and to the parking brake handle (which is an umbrella type from some English Ford of the 1960’s) at the other end. The difficult feature of the parking brake cable is that it is routed through the chassis, with luck it will still be there. I changed my cable when the body was off and the transmission removed, maybe it can be done when the vehicle is assembled and hopefully someone here can advise how.
Those rods (called actuating rods in the parts manual), are new adjustable rods. These allow the length to be modified within limits, and make the job of setting up the handbrake easier than the originals (which were fixed length).
As Richard says, you seem to have the most of the parts. Hopefully the tree is already in place on the chassis. Is the umbrella handle still in place under the steering wheel?
The cable can indeed be fitted without too much difficulty. You’ll need to take the right hand seat out and remove the blanking plate (large blind grommet) in the chassis tunnel beside the seat so that you can route it correctly. And possibly grease the prop shaft U/J while you’re in there. As soon as you start looking you’ll see the guide holes in the chassis that the cable routes through - one at the rear on the right that aligns with the tree, and two at the front for LHD or RHD orientation.
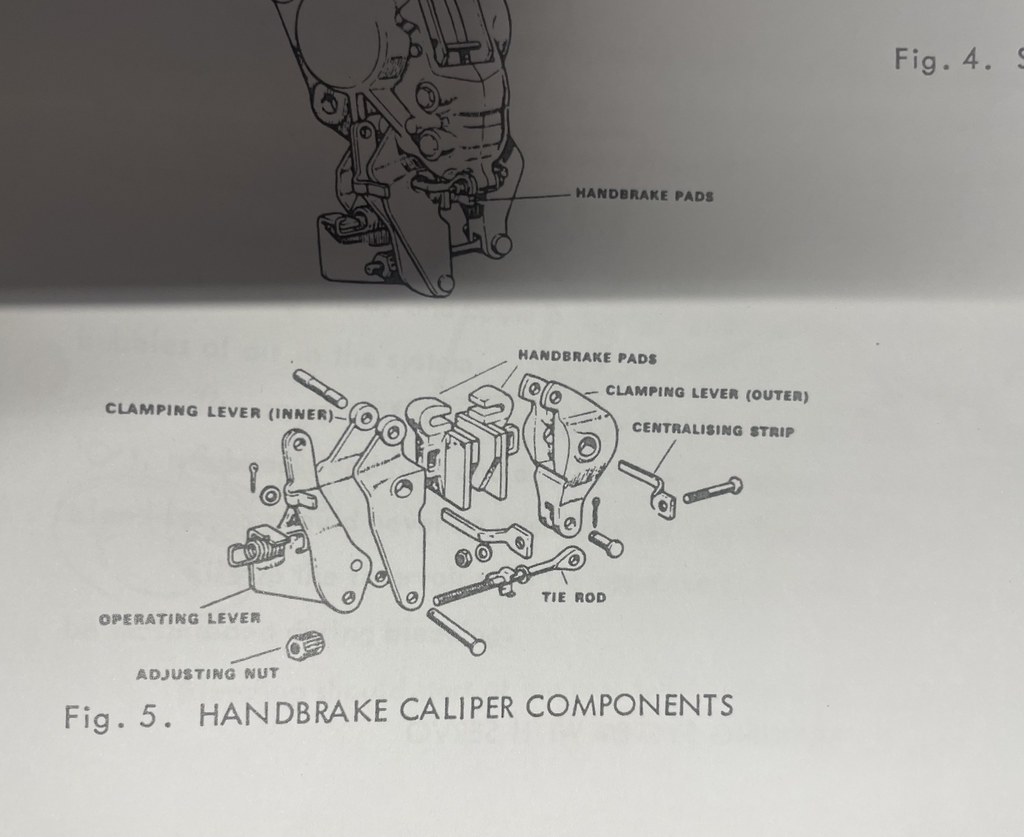
Looking at the box of mechanism parts I can see that there is one item that is possibly missing. If you look at the mechanism in the top left of the box you can see a bushing located in the operating lever. If you then look at the lever on the other mechanism (centre lower of box) the bushing is missing. The operating rods are attached to these levers with a bolt and nut. Without the bushing correct adjustment will be impossible.
Unfortunately the bushings are not identified in the parts book. They are available, or they are easy enough to manufacture if you have the resources.
Mike
edit: the bushings are listed but not shown p/n 026J0015. And the rods attach with a clevis pin and split pin, not a bolt and nut.
Thanks everyone, I really appreciate the help. Thats a great link @Elanintheforest
I had a few minutes to sneak into the garage and take a few pics from the manual and poke my head inside the car. I can confirm the umbrella handle is in the car, but I didnt see a cable. I also took a few pictures from the manual showing diagrams of the hand brake also
I will need to get that box and lay out everything to try and determine exactly what I have and whats still missing. It looks like some missing hardware has already been discovered by you guys, so thank you for that.
Question: The pieces in the box appear to have survived some time in the UK and their condition reflects that. Is there a preferred way to renew them for another 50 years? Theres a local powdercoating place that had done a nice job on my TTR 26R A-Arms, but not sure if these should be powdercoated. Seems like they should be zinc-coated or something like that. If its the latter, does anyone have a recommended place to use? Ideally in Southern California? I know many places have a minimum they would want and I doubt these pieces would reach that threshold. I also know some people DIY Zinc-Coating but use some hazardous chemicals and I would rather not go that route having young children in the house.
Another thing worth mentioning are the pins that the handbrake pads hang on. You will see that they have a reduced diameter in the centre to locate in the pads. To remove the pins notice they are threaded internally to accept a suitable screw or bolt, usually attached to a slide hammer or similar. Yours are already disassembled but it’s worth checking that they haven’t been “butchered” during removal.
I have mine zinc plated, and that lasts for many years. I really wouldn’t use powder coating on brake parts as it is only a plastic coat and that could melt with brake components getting hot.
I replaced all the pins (they cost very little) and everything now works as it should.
Oh yes, those little bushes in the operating arm make all the difference! It took me a long time to figure out that I was missing one.
I didn’t have the resources to make one but discovered that my local hardware store (in Boston) had exactly the right size bushes, in aluminium. Not perfect but I figured that there wasn’t going to be much wear - I rarely use the handbrake. And if it ever does wear out it’s easy enough to replace.
You might want to speak with Ken at Dave Bean Engineering. He rebuilt my calipers and used a product that converts them to black. Seems to be holding up nicely. May be another option for you.
Winston
For what its worth, the calipers were originally cadmium plated when made, but that is now restricted because of the toxicity of cadmium. Purists regard zinc plating as a bit garish, but I have my calipers zinc plated, and after a few miles of road dirt, I can’t tell the difference.
I tried to reach out to Dave Bean, but got an answering machine but couldnt leave a message. I will try them again next week.
I did empty the contents of that Box and laid everything out. It appears I have everything, but not everything looks usable. I hope I can send the contents of this box over to Dave Bean and have him send me back ready to go.
Great read so far. The really fun bit will be when you get to the end and discover that the handbrake really isn’t all that effective!! I recommend a chunk of wood behind the driver’s seat as a backup method of holding the car in place.
Dave Bean is closed on all Fridays. Also this Monday for Memorial Day. Ken has a wealth of knowledge and was super helpful on my S4 restoration, patiently answering my uninformed questions. Besides rebuilding the calipers he also rebuilt the steering box and rear suspension uprights.
Winston
Please don’t keep repeating this utter drivel and incorrect myth. Correct me if I am wrong, you are a 10 minute Elan owner. Take it from a 45 year continuous, multiple Elan owner, that the handbrake will work perfectly, IF, all parts of the handbrake mechanism are within spec., that they are put together correctly, and then adjusted correctly.
Further, I will have a wager with anyone, my £100 against your £10, substitute for $ if you are of that persuasion, that one person cannot move any of my cars 1" by pushing on the rear flank.
Form an orderly queue and have your tenners ready.
Plus one with Leslie above,
I fitted the shorter cable from Sue miller which allows the handbrake tree to operate at a more efficient angle and adjustable tie rods. The hand brake will now hold the car safely on a 1 in 6 gradient. We have a few of those round here.
Eric in Burnley
1967 S3SE DHC