Oh yes, quite a possibility! 
Tim
Oh yes, quite a possibility!
Tim
Based on what I’ve learned about these engines they seemed to have been assembled as CBU units by a third party contractor. They were probably built by that contractor to order from either Ford (to fulfill Escort and Cortina builds) or Lotus (to fulfill Elan builds). The contractor would have been responsible for stamping the engine numbers before shipping them according to the order from either Ford or Lotus. I very much doubt it was Lotus themselves assembling these engines. The fact that the letter sizing, font used etc. for the block engine number stamping is the same irrespective of what the engine was fitted to (Elan, Escort, etc.) suggests to me that it was the engine build contractor stamping the numbers and not Ford or Lotus
The Twincam was originally assembled for production by JAP until around 1967. When Lotus moved to Hethel they setup to do their own engine assembly.
cheers
Rohan
I know that is what it says in the Miles Wilkins book but it doesn’t really make good sense from a production engineering point of view given the need of supply to both Ford and Lotus. Lotus speciality back then was not engines and building small volume complex specialized engines for a volume manufacturer like Ford is not something they would have have been interested in doing either (although they may have partially assembled the short block). Chapman only ever saw an engine as being a means to an end. Personally I’m not sure the Miles Wilkins book is 100% correct here (perhaps JAP assembly went beyond 1967 up until there was no longer a need to supply Ford for their production as well) and I’ve never seen pictures of Lotus Ford engines actually being assembled at a factory. It would be interesting if they exist somewhere.
[attachment=0]Twin Cam Engine Assembly.JPG[/attachment]
Picture in colour of the engine machine shop at Hethel from the 1970 Annual Report.
Tony Rudd writes about the ‘Lotus’s own engine build facility’ at the time of his arrival there in 1969. He goes on: ‘The Twin-Cam cylinder head was machined on antiquated multi-spindle pillar drills …’
Tim
trw99 and mbell. Thanks - that’s very interesting information and it was great to see those old photos. It’s a pity photos such as these don’t seem to be formally documented in a book somewhere.
Ford probably contracted the final build to Lotus in that case. I’m not sure how the Escort Twin Can engines were built with their different sumps and oil pickups. Perhaps they were supplied to Ford without these parts fitted. My sleuthing of these parts on my cars suggest they were originally painted black and therefore separate from the grey painted parts of Lotus production. Around 900 of these engines would have been built for UK Escort TC production and a further 850 for Australian Escort TC production.
I think there’s still a strong possibility that Ford supplied Lotus assembled short blocks (i.e blocks bored with pistons and crankshaft fitted) and leaving Lotus to do the rest. Assembly process for just the short block would not have been much different to Ford’s regular engines so it would have made some sense for them to do it.
I wonder where those assembly line workers ended up. They probably would have had more interesting stories to tell than those working in the office! There was certainly quite a range of different specification engines that the line would have had to cope with.
A little bit of progress made. I heated up the crankshaft sprocket and affixed a suitable puller. Still needed to apply a considerable amount of torque but it gave up in the end. Glad I did when you see the muck left behind. After cleaning and on examination of the old Morse sprocket, it is clear it has done very little work and will go again. You cannot beat original OEM parts if they are in good condition.
All for now.
Leslie
I do not recall Ford’s own brand of bearings before. Perhaps that is because I have only ever rebuilt Lotus engines! Interesting to note that the bearings fitted were not made of VP material. The crank is still on standard sizes, but although the journals appear in reasonable condition, on close inspection, there is quite a lot of fine scoring and will need to go to 10 under.
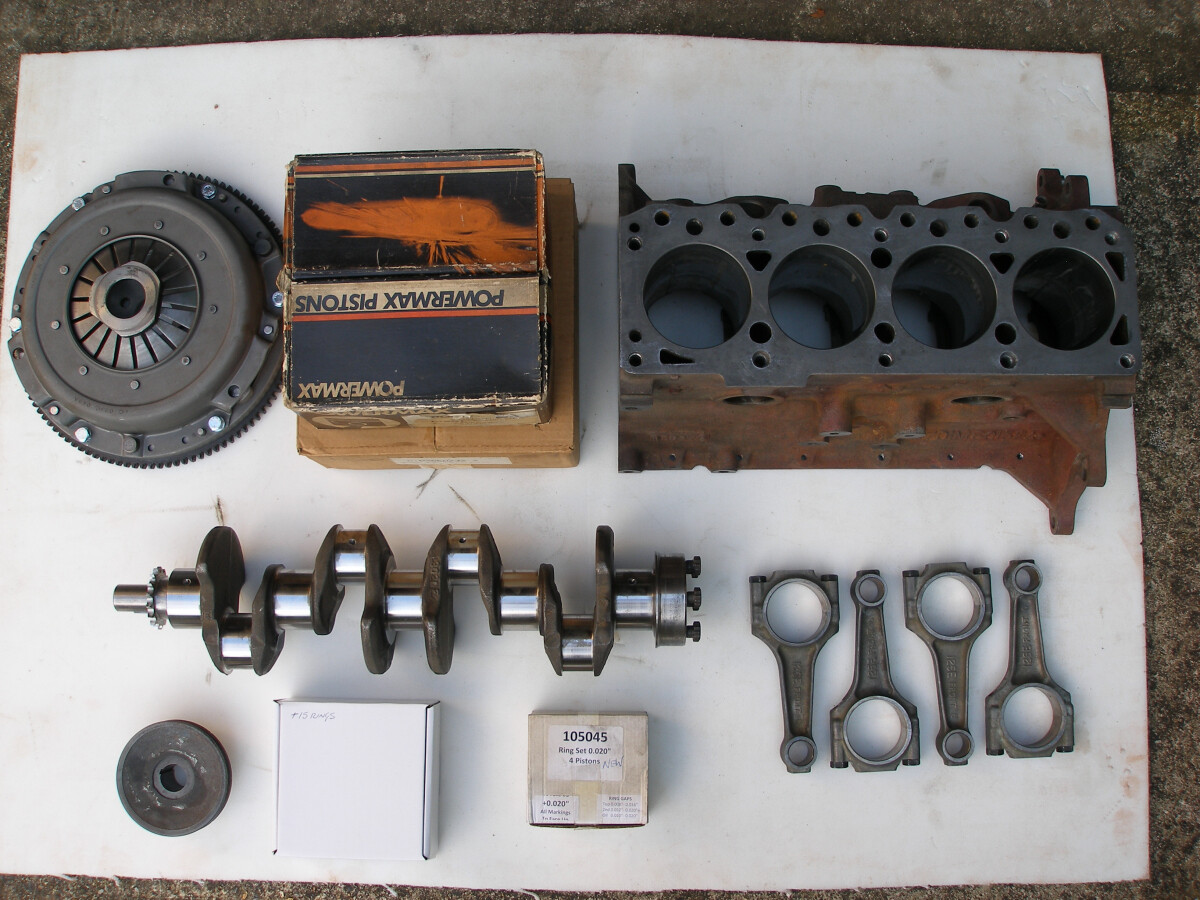
The block and rotating parts are finally ready to go off to the company I shall be using this time to carry out a rebore and full engine balance. The block was cleaned in its bath, all paint removed, and all other parts either cleaned, refurbished or NOS. I have supplied NOS + .015 and + .020 Lotus pistons to see what the smallest over bore is that they can get away with.
I had a small mishap when a 1/4" tap broke in the block as I was chasing out the threads. The shaft of the tap was tapered. I shall not be using one of those again, even though I had used it probably 5 times to do the same job. I had to have it spark erroded to get it out. The company I used did a great job, but I was pretty miffed to see that they had scratched one of the end faces of the block when handling it.
Looking forward to getting all the bits back to start reassembly.
Leslie
Leslie,
Don’t beat yourself up about breaking a 1/4” tap which I assume was a corse thread. I think that is the easiest size to break. When I was an apprentice we had our own spark erosion machine, “not another 1/4” tap!” was the cry from the man who used the machine.
Richard Hawkins
No, I am not Richard, sh1t happens sometimes. I am wondering, for the future, if one can actually buy a 1/4" UNC tap that is not waisted, or is it waised to aid swarf removal? Will have to look into it. TBH, I was more annoyed about the company scratching one end face of the block than the broken tap. Oh well.
Leslie
You can buy specific thread chasers, which are designed to clean and fix minor thread issues. So also don’t risk damaging the thread. Don’t know if there any more snap resistant thou.
I collected my engine parts from the workshop a while ago now and washed all parts again. Everything is spotless. The block is now in paint and assembly has started. The block only needed to go out to 15 thou over, which I was very pleased about, and I am able to use the only overbore size pistons that Lotus quoted in period. What did they know.
The jackshaft has been installed with a new thrust plate and lock tabs. A lot of the parts from this engine had been blacked, but after putting them through the ultrasonic, some of the blacking has come off and some has stayed, which makes them look crap in the pictures. The jackshaft sprocket being a case in point, but having examined it for wear, it was to good not to reuse. No wear, with manufacturing marks between the teeth still clearly visible.
The whole engine has been balanced, and I have fitted a new spigot bearing to the crank. The shop said that there was minimal metal removed from the crank, likewise the flywheel and crank pulley. The rods were a different matter. Three rods weighed exactly the same, but the fourth weighed 6 grams heavier than the rest, so there was some grinding to be done there. The shop provided a printout of everything.
More to come.
Leslie
Hi Les
If you don’t mind me asking, how much did the machine shop charge to bore your block out? I’m at a similar stage to you with this little green DHC and I don’t know what I should expect, cost wise. Other question I wanted to ask is how did you get the block so clean? Or rather, what did you use to clean it (and the other components). I’ve had reasonable success with petrol followed by a generic degeasant but my block looks nothing like yours.
Cheers
JonB
They charged £152 + VAT.
I spent days cleaning the block Jon, but the first thing I do is drill out ALL plugs. Then leave it in its bath filled with Jizer or Gunk, same stuff, for a day. See previous pics. Thats about 30 litres in the bath. Takes the skin off your hands, so wear rubber gloves. Then scrub with various brushes on the inside of the block, including going down the oil ways with my shotgun cleaning tools. Remove from bath, then hose off and dry. Next applied nitromors to the old red paint, wiped off, then applied a second coat. That got down to the outside block surface.
Then I set about the end faces with a liquid rust remover. They had surface rust on them but the rust remover completely took that down to the original manufacturers finish. Well pleased. Then mounted the block on its stand outside and attacked it with rotary wire thingys, pictured. Then into the bath again. Wash off, dry, and off to the machine shop.
Back from the shop and into the bath for the last time. Out, and wash out with a hose. Been meaning to buy a pressure washer for years, maybe for the next build. Dry thoroughly in the sun, with lint free rags and a hairdrier. Not much use for that now on my head  Very important now to remove ALL moisture from the machined surfaces, or flash rust will form.
Back onto the bench and wipe down with celulose thinners. Start painting. 2 coats. Dont think I have missed anything 
Some shops offer acid dipping which I have used before. Then I take the block home and start cleaning it 
All other engine parts are cleaned in my ultrasonic tank.
Now you know why my engine builds are expensive. If you want the best…
Leslie
Absolutely outstanding, Les!
yeah, got the same head-scratching goin’ on here. that old engine block, man it’s like a cold case mystery, huh? one piece sayin’ it’s from lotus, the other screamin’ ford. and the timeline, don’t even get me started. no wonder you’re havin’ a hard time piecing it all together. that leftover engine’s seen some stuff, alright. guess we can only guess unless the person who pulled it outta the first ride shows up and spills the beans. but what’s the chance of that , right?
Leslie,
You’re making a lovely job of it.
For the rust remover did you opt for “evapo rust”? I’ve heard great things but never tried it myself, but clearly need to get some of whatever you used!
JonB,
As another data point I looked out my machining bill from Gosnays, came out very slightly less than Leslie quoted for the rebore at 35 a cylinder but this was a couple of years back. For reference they charged 55 to prep for dip (degreasing and drilling out rounded plugs etc) and 85 to acid dip. All plus vat. It came back looking like a new block compared to the state it started in but not quite as nice as Leslie’s.
The other big win was a huge amount of sludge that was compacted around the bottom of the waterways was gone.
Cheers,
Will
I went onto Gosnays very old web site, and the “Contact” link was dead. I bet they folded during COVID, like many others. Especially the ones near me!